When we post anything in our blogger post then some times we have to give the info about the author but some author always show a about author info below each post, and we also give the same widget but some blogger write codes at end of the each post, when we post anything but in this widget you have to install codes only one time, and you are done.
Add Pro About Author Widget
- Login to Blogger > Dashborad
- Click on Drop Down Menu and select Template
- Backup your Template before making any changes to your blog
- Now Click on Edit HTML > Proceed > Expand Widget Templates
- Press Ctrl + F and search the code shown below.
]]></b:skin>
- Paste below code before ]]></b:skin>
/*------Codes By www.widgetgenerators.blogspot.com------*/
#wg-authorbox {
background:#333 url(http://2.bp.blogspot.com/-L5Tvv0yJrr4/TvsFt-Mh82I/AAAAAAAACC0/9eva5jXci8U/s1600/about_author.jpg) no-repeat scroll left top;
width:auto;
overflow:hidden;
color:#fff;
-moz-border-radius:15px;
-webkit-border-radius:15px;
border-radius:15px;
margin:5px auto;
padding:40px 10px 10px 20px;
}
#wg-authorbox:hover {
-webkit-box-shadow: 0px 0px 10px rgba(0, 0, 0, .3);
-moz-box-shadow: 0px 0px 10px rgba(0, 0, 0, .3);
box-shadow: 0px 0px 20px rgba(0, 0, 0, .3);
}
#wg-authorbox h4 {
font-size:16px;
color:#fff;
clear:none;
margin:0;
padding:10px 10px 5px;
}
#wg-authorbox .author_small {
font-style:italic;
}
#wg-authorbox img {
-webkit-transition: -webkit-transform .15s linear;
-webkit-box-shadow: 0 3px 6px rgba(0,0,0,.25);
-moz-box-shadow: 0 3px 6px rgba(0,0,0,.25);
padding: 5px 5px 5px 5px;
-webkit-transform: rotate(+2deg);
-moz-transform: rotate(+2deg);
float:left;
border:4px solid #F9780E;
margin:10px;
padding:0;
}
#wg-authorbox img:hover {
-webkit-box-shadow: 0 3px 6px rgba(0,0,0,.5);
-moz-box-shadow: 0 3px 6px rgba(0,0,0,.5);
-webkit-transform: rotate(-1deg);
-moz-transform: rotate(-1deg);
}
#wg-authorbox p {
color:#F9EAD4;
margin:0;
padding:0 10px 10px;
}
#wg-authorbox a {
color:#F9780E;
}
- Now search for <data:post.body/>
- Paste below code after it.
<br/>
<br/>
<div id="wg-authorbox">
<img alt="About Author" src="https://blogger.googleusercontent.com/img/b/R29vZ2xl/AVvXsEitJVZy1gLQh3SMJdo965MNn2eIO2LEiAhoLUU9Kp8DuOae544sQf6oe7fLh6PBH7wdkYl141J7HEprpbOjI4anuU15z93zcJrDc5ROZqB-4OpjFnbKZBBIuCBnOLoVDgkwcY2-98P7SsS1/s1600/Butnty.jpg" height="100" width="100"/>
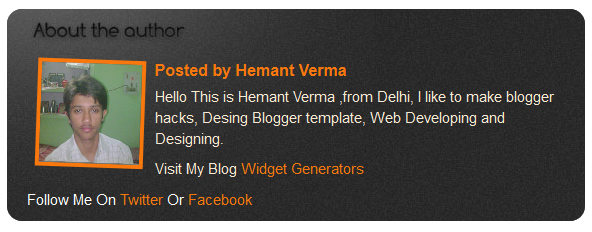
<h4><a href="https://plus.google.com/108584822806858722112" title="Posts by Hemant Verma" rel="author">Posted by Hemant Verma</a></h4>
<p>Hello This is Hemant Verma ,from Delhi, I like to make blogger hacks, Desing Blogger template, Web Developing and Designing. </p> <p>Visit My Blog <a href="http://www.widgetgenerators.blogspot.com">Widget Generators</a></p> | Follow Me On <a href="http://www.twitter.com/WidgetGenerator">Twitter</a> Or <a href="http://www.facebook.com/WidgetGenerators">Facebook</a></div>
- Save your template after changes.
Make Changes....!
- Replace this link with your own image link https://blogger.googleusercontent.com/img/b/R29vZ2xl/AVvXsEitJVZy1gLQh3SMJdo965MNn2eIO2LEiAhoLUU9Kp8DuOae544sQf6oe7fLh6PBH7wdkYl141J7HEprpbOjI4anuU15z93zcJrDc5ROZqB-4OpjFnbKZBBIuCBnOLoVDgkwcY2-98P7SsS1/s1600/Butnty.jpg
- Replace this Google + ID with your own Google + ID 108584822806858722112
- Replace this name with your own name Hemant Verma
- Replace this author bio with your own bio Hello This is Hemant Verma ,from Delhi, I like to make blogger hacks, Desing Blogger template, Web Developing and Designing
- Replace this blog link with your blog/site link http://www.widgetgenerators.blogspot.com
- Replace this blog name with your blog name Widget Generators
- Replace this twitter user name with your own user name WidgetGenerator
- Replace this facebook user name with your own user name WidgetGenerators


0 comments:
Post a Comment